Tag Archives: DIY

Homegrown Collective August Box Review

Let me start by saying that the products featured in this post were provided to me free of charge courtesy of Homegrown Collective.

Homegrown Collective August Box Review and Giveaway!!Homegrown Collective August 2015

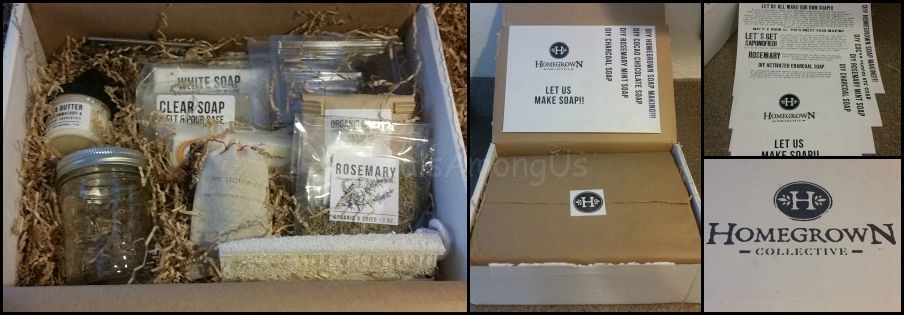
I remember my first foray into crafts – it went something like “here is $50.00 and go get a hobby”. These fateful words were said by my father during one of my many groundings as a teen. I was being particularly annoying, hoping that would release me from my punishment, and I think I was pushing all my worn out fathers buttons. I was only 16 and honestly overwhelmed by the different sections at the craft store and all the unknowns that lie ahead of me. I decided on materials to redo my childhood dresser.

Even then I was a fan of a good DIY project and love the opportunity undertake something new. I was given an opportunity this month to review the Homegrown Collective box. The theme for August was “Let Us Make Soap” – all the materials needed to make your own soap. Soap making has always been something that I have wanted to try (Jason was surprised this was a first time thing for me), but have been apprehensive due to the lye and the caustic nature of the ingredients.

Homegrown Collective took this common soap making fear into account when they curated this box. The recipes include were charcoal soap, cacao chocolate soap and rosemary peppermint soap. The included soap was a simple base of three soaps that only needed microwave melting, still allowing the addition of my choice of ingredients. The three soaps included were goats milk soap, a simple clear soap and a simple white soap. Each of these 3 melted easy in the microwave (in about 40 seconds) and hardened just as simply, making adding ingredients easy.

Continue reading

My Paper Pumpkin August 2015 Kit Review

Let me start by saying that the products featured in this post were provided to me free of charge courtesy of Stampin’ Up.

My Paper Pumpkin August 2015 Kit Review and Giveaway

My Paper Pumpkin August 2015

This past holiday season we were at our cousins house, as he has recently taken over as official Christmas Eve host. While we were getting drinks I looked up and discovered the cutest tins with chalk writing announcing its contents. I mentioned that I loved the kitchen decorations and the hostess mentioned she was loving the chalk look and she wanted to expand upon it. When I received the August My Paper Pumpkin kit I was immediately brought back to that conversation.

I had the chance to review My Paper Pumpkin’s kit box’s previous months box (click here). I was thrilled to be given the chance to review this months box as well. The theme for August was called “Chalk It Up To Love”.

Continue reading

Upcycle Your Wardrobe Review

Upcycle Your Wardrobe: 21 Sewing Projects for Unique, New Fashions Review and Giveaway

As many of my regular readers know I love to up-cycle items whenever possible. The last project I up-cycled was a maxi dress I purchased at Target. I did not like the top but loved the pattern and the way the dress hung to the floor. This dress sat in my closet each season, and when summer would roll around I would try to rig the dress into a skirt and wear it that way. This never really worked the way I hoped and it never looked quite right when I was wearing it. This went on for a couple of summers until I finally purchased a new sewing machine.

Having a new sewing machine finally allowed me to open my mind to the possibility of cutting the dress at the top and giving me that bottom part I desired. One night, when I was unable to sleep inspiration hit me and I knew how to cut the dress, while preserving the skirt. I eagerly pulled out my sewing machine and got the scissors out, and immediately got to cutting and resewing. After about 45 minutes what resulted was a skirt with a matching scrunchie where there was a full dress an hour before.

Continue reading

Colortime Crafts and Markers Review

Let me start by saying that the products featured in this post were provided to me free of charge courtesy of Colortime Crafts and Markers. This post may have affiliate links but this in no way will influence the review to follow and all opinions are my own.

colortimecrafts-logo-300x300Colortime Crafts and Markers Review & Giveaway

I live in a city that has outlawed and banned the use of plastic bags. I am truly torn about this development as the plastic bags have their own use in a house with 2 cats but the environmental impact caused by these bags is hard to ignore. Being that I am in this plastic bag less town we have invested a good amount of money into different variation’s of the “recyclable/reusable” bag.

I recently was sent a 4 piece kit that helps add to our collection of recyclable bags. Colortime Crafts and Markers was generous enough to send me 1 “Recycle” tote bag and 3 fabric markers (Blue, Yellow and Green) for me to make my own bag. Colortime Crafts and Markers offers ready to color craft items as well as fabric markers.This allows kids and adults to decorate and personalize products themselves.

Colortime Crafts and Markers Continue reading

Epson LabelWorks Printable Ribbon Kit Review

Let me start by saying that the products featured in this post were provided to me free of charge courtesy of Epson and Global Results Communications . This post may have affiliate links but this in no way will influence the review to follow and all opinions are my own.

Epson LabelWorks Printable Ribbon Kit Review

Epson LabelWorks Printerable RIbbon KitI have a confession: I am a hoarder of ribbon. I have a huge box in my house that contains my ribbon collection.  Many times in my crafting days I have thought it would be personal and unique to add writing to my ribbon. The only problem is that there was no way to do this in a clean, professional yet still crafty way. I am happy to say that it is not long the case.

I would like you all to meet the newest item to my ever-growing craft collection: the Epson LabelWorks Printable Ribbon Kit.

IMG_20150807_204758677Let me introduce you to this 1 pound wonder. The Epson LabelWorks Printable Ribbon Kit comes neatly stored and packaged in a carrying case. The case includes the LW-300 Epson LabelWorks Printer, 2 – 1/2″ wide printable ribbon cartridge in beige and navy as well as a user guide. This is a LabelWorks printer, meaning that as long as you have a LabelWorks cartridge that is compatible with the LW-300 the options become endless. The compatible cartridges range from sticky labels, glow-in-the-dark tape and iron on labels.

The LW-300 Ribbon Printer comes with over 300 symbols and over 75 frames, as well as 14 font types. The fonts come in 5 sizes and 2 widths and include Sans Serif, Sans Serif HG, Sans Serif ST, Gothic, Bold Gothic, Roman, US Roman, CL Roman, Mincho, Gyosho, Reisho, BR, CB, Script PL. The printer’s built-in memory is able to store up to 30 label design files for easy reference and accessibility for future use.

Continue reading

My Paper Pumpkin July Kit Review

Let me start by saying that the products featured in this post were provided to me free of charge courtesy of Stampin’ Up. This post may have affiliate links but this in no way will influence the review to follow and all opinions are my own.

My Paper Pumpkin July KitMy Paper Pumpkin July Kit Review and Giveaway

There is something really special about receiving a piece of mail. To know that the sender not only took the time to write something special, but make the card as well makes the mail close to priceless. Whenever I think of friendship I think of two friends sitting over a cup of coffee or a hot latte catching up on each others lives. This month’s My Paper Pumpkin by Stampin’ Up kit celebrates this idea in the form of a card kit.

I  had the chance to review My Paper Pumpkin’s kit box’s previous months box (click here). I was thrilled to be given the chance to review this months box as well. The theme for July was named “Thanks A Latte”.

Continue reading

My Paper Pumpkin May Kit Review and Giveaway

Let me start by saying that the products featured in this post were provided to me free of charge courtesy of Stampin’ Up. This post may have affiliate links but this in no way will influence the review to follow and all opinions are my own.

My Paper Pumpkin May KitMy Paper Pumpkin May Kit Review and Giveaway

I have mentioned in the past that I am a nostalgic girl and I love to send handwritten cards and letters to my friends. I am also a scrapbooker and paper crafter. which is a wonderful full cycle of the greeting card /gift wrap process for me to complete.

I have loved Stampin’ Up’s stamps for as long as I have been a scrapbooker, and have been curious about their monthly subscription program. I recently had the chance to review the My Paper Pumpkin’s May 2015 kit box. The theme for May was a birthday theme named “Birthday Bundle”.

This little 10 by 6.5 size box comes jammed packed with the items you need to complete the project for the month. Included in this months box were the following:

My Paper Pumpkin May Kit

Continue reading

A Homemade Scratch Pad for the Muggles

Begin scratch padA Homemade Scratch Pad for 2 Muggles

The one benefit of being a review blogger is that we have a nice flow of boxes arriving which makes for a lot of cardboard. I hate the idea of just throwing the cardboard away and I have long talked about making a scratch pad for Maggee and Murfee. I see these grand cat scratch posts that people make and while I dream of creating one, realistically I know that it is best to start easy and build up.

These two animals love their scratch pad and I can honestly say they rarely use our couch or items they should not use. To thank them for their pad loyalty, I figured it was time to make them their own scratch pad.

Step 1 of Cat Scratch PadI gathered my materials:

  • A box with sturdy sides – I used a box from a recent Costco trip that worked great!
  • A ton of cardboard to slice and dice
  • A ruler, hot glue gun, extra glue sticks, a pencil and a sharp utility knife.
  • Space to stack and space to spread your arms
  • About 3-4 hours of time including prep to completion

Once I gathered all my materials I sat down, I came up with my plan which basically consisted of measuring the inside of the box. I measured the length and height of the inside of the box and then took those measurements and put them on a piece of cardboard to be used as my template.

Continue reading